tiistai 26. syyskuuta 2017

Unity platformer - Animating sprites

NME17AP

Lukuvuosi 2017-2018

Animating sprites in Unity is fairly easy. First thing you’re going to need is a sprite sheet. It’s a (preferably) Photoshop document where all the sprites are evenly placed for animation. Make sure that there are no odd pixels in the sprite sheet since those are a real pain to remove later and if not removed they will create small selection areas in the sprite editor and those will be included in the animation.

When you have the sprite sheet import it into Unity. Select the usual settings from the inspector but this time choose multiple for the sprite mode. After applying the settings click open the sprite editor. 


If the sprites are placed correctly in the sprite sheet, then automatic slicing can be used. This will create the animation frames automatically. If the sprites are following a regular pattern on the sheet, then grid by cell size/count can also be used.


In the project window you can no click the sprite sheet open. Select all sprites with shift key and drag them to the scene. This should automatically open a window for saving your animation. Create a new folder named animations and save your animation under it.


Now you can start to work on your animation. Set your sample rate for 60. This means it plays 60 per second. Now move your frames in the animation window so that you get the right speed for a smooth animation. With the play button you can test the animation and when it’s complete push the record button to stop the recording. Create animation for both idle and walking states.


Then you need to open the animator window. It can be opened from the top tool bar under window tab. In the animator window you need to create a new state for walking. By default, there should already be idle state. Rename the created state and choose the correct motion for it. The motion will be the earlier created animation for walking which should be found in the list of motions.


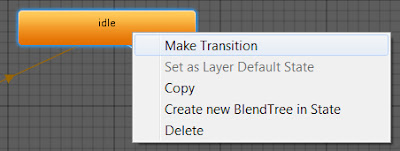
You need to connect the states. This is done with transition. If you right click the idle state a window pops up allowing you to choose the make transition action. Do this both ways so the animation will flow back to the idle state.


Next stop is to create a new parameter. This will define which state will be used when moving the character. Create Boolean and name it. Boolean is a data type containing two values: true and false.


Now you need to use the newly created parameter in the states. You can open new options by clicking the transitions in the inspector. At the bottom in the conditions you can use your boolean parameter. The idle state will need to use true value because with true in transitions to the walking state. In the walking state it will be opposite.


Lastly you need an action for the playmaker to understand the animator. Use set animator bool action in your walking FSM. Put checkmark in the value section. This will make the bool true and walking animation will commence. Don’t put the checkmark in the idle state and the idle animation will play when the character is not moving.


Here are some Unity tutorials explaining the animation and animator more profoundly:


maanantai 25. syyskuuta 2017

Unity platformer - Death zone and collectibles

NME17AP & NAV16AP

Lukuvuosi 2017-2018

This time we are going to learn how to create death zone and pick up collectibles.

At first we need to create empty game object from top gameobject menu. The object should be placed underneath the floor. Character dies if it drops below the walking platform. We need to add box collider 2D for the empty game object. Be sure that the collider is wide enough that when the character falls, it makes contact with the death zone. Then we are going check the is trigger box in collider window. This enables the use of trigger action in playmaker and makes the collider transparent so that character will not stop when hitting it.


Then it’s time to add FSM to the death zone. Start state will be idle and has an action trigger 2D event in it. When character makes contact with the death zone, the trigger event is sent to the next state. In the next state we are going to use set position action to set character back to the position it started. Put the start values in the x,y and z axes. When you test the game, the character should move back to the start position when it makes contact with the death zone.


Then we are going to pick up some objects. Draw a simple circle in Photoshop and import it into Unity. Add a circle collider 2D to it and tick the option is trigger. 


Make FSM for the new object. In the start state we are going to use trigger 2D action. Make a new event for the action and create a new state.


This state has the float add action. Float is a decimal number and we're going to add 0.25 each time object is collected. We are using float because in the later tutorials this number is needed for a different object to work correctly. Create a global float variable called collectible to use in that action.


 Last state has the destroy self action. When player comes in contact with the object it disappears.


EXTRA ASSIGNMENT: Make the player parent object to the camera. This is done by dragging the camera in the hierarchy window under the player so that they are linked. Now you need to figure out how to stop the camera from following the player when it falls to its death. And set the camera back to the starting point when the player respawns. You’ll also need to make the game wait for a while before respawning the player.

maanantai 18. syyskuuta 2017

MATERIAALIT

NME17AP


Lukuvuosi 2017-18

Materiaalit muodostuvat monesta eri tekstuurikartasta, jotka yhdessä saavat pinnan vaikuttamaan halutun näköiseltä. (puu, kivi, metalli jne.)

Osoitteesta https://www.textures.com/ löytyy runsaasti ilmaisiakin tekstuureita.

Realistisissa materiaaleissa on vähintään neljä eri tekstuuria:


Diffuse Map (Color Map)
Värikartta, josta materiaali ottaa värinsä.


Normal map
Kartta joka näyttää pienten pintarakenteiden muodot, ilman että lisätään geometriaa.
Voidaan tehdä highpoly-objektista tai generoida apuohjelmien avulla vaikka suoraan kuvasta. (CrazybumpxNormalNormalMap-Online, MindTex 2)

Hyvää lisäinformaatiota aiheesta: http://wiki.polycount.com/wiki/Normal_map 

Täällä ohje Normal Mapin tekemiseen 3ds Maxilla, tämän tekemiseen tarvitaan sekä highpoly-, että lowpoly-objekti:
http://help.autodesk.com/view/3DSMAX/2015/ENU/?guid=GUID-0E460416-8F85-49F0-AE45-4E79B929FF26


 Ambient Occlusion Map (AO)
Mustavalkoinen kartta, joka simuloi "yleisvalon" aiheuttamat varjot. Korostaa yksityskohtia.


Specular Map
 Mustavalkonen kartta, joka kertoo mitkä kohdat materiaalissa kiiltää ja mitkä ei. Valkoinen = 100% musta = 0%


Unityn omasta materiaalin luonnista ohjeita:
http://docs.unity3d.com/Manual/Materials.html

Ja yleistä puhetta aiheesta:
https://creative.pluralsight.com/subject/3d-texturing-tutorials
(Pluralsightin sivuilla on paljon hyviä tutoriaaleja)


TILETTYVÄT TEKSTUURIT

Tilettyvillä tekstuureilla tarkoitetaan kuvia, joita voi latoa vierekkäin ja päällekkäin ilman että niiden välinen raja näkyy.

TEHTÄVÄ 1

Ota kuva jostain tekstuuripinnasta (lattia, seinä, pöytä, asfaltti, yms.).

Valitse sellainen pinta, jossa valo käyttäytyy mahdollisimman tasaisesti. Kuvatessasi pidä kamera kohtisuorassa kuvattavaan pintaan nähden.

Avaa ottamasi kuva Photoshopissa.

 Avaa uusi tyhjä kuvapohja ja tee siitä 512 x 512 tai 1024 x 1024 pikselin kokoinen.

Kopioi tekstuuripinnasta ottamasi kuva ja liitä se uuteen tyhjään kuvapohjaan. Ehkä kannattaa vielä rajata kuva uuteen kokoonsa, eli Select > All ja Image > Crop.

Valitse Filter > Other > Offset.

Kirjoita Horizontal-kenttään puolet kuvan leveyden pikselimäärästä, esim. +256, jos teit 512 x 512 kuvapohjan.

Kirjoita Vertical-kenttään puolet kuvan korkeuden pikselimäärästä, esim. +256, jos teit 512 x 512 kuvapohjan.

Jätä Wrap Around -valinta päälle ja klikkaa Ok.

Kuvan reunat ovat nyt siirtyneet kuvan keskelle, jossa ne näkyvät häiritsevästi.

Käytä Clone Stamp -työkalua kuvan siistimiseen, jonka jälkeen kuvasi tilettyy kivasti. Clone Stamp maalaa kopiota valitsemastasi alueesta kuvassa. Valinta tehdään klikkaamalla haluttua kohtaa vasen Alt-näppäin pohjassa.


KÄSINPIIRRETYT MATERIAALIT


Käsinpiirretyt materiaalit ovat oma tyylisuuntansa, jossa lähes kaikki informaatio on piirretty (yleensä) diffuusikanavaan.
Voidaan myös puhua tyylittelystä, kun puhutuaan käsinpiirretyistä materiaaleista.
Pääsääntöisesti käsinpiirretyssä käytetään kahta kanavaa: Diffuse ja Specular. Toki muitakin voidaan käyttää, mutta yleensä niitä ei tarvita.


Hyvää infoa aiheesta:
http://wiki.polycount.com/wiki/TexturingTutorials#Painting_Stylistic_Textures 


Tekstuurit ja power of 2
Tekstuurien koko on aina kahdella kerrottuna, johtuen näytönohjaimen tavasta käsitellä tekstuureja.

Esimerkki: 8x8, 16x16, 32x32, 64x64, 128x128, 256x256, 512x512, 1024x1024, 2048x2048, jne.
Koon ei tarvitse olla aina esim, 1024x1024, vaan voi myös olla vaikka 512x1024 jos ei tarvita enempää, kunhan molemmat koot noudattavat power of 2 suhdetta.

PBR (Physically-Based Rendering)
On uusi rendaus tekniikka, joka on kovaa vauhtia muodostumassa uudeksi standardiksi. Joka tuottaa realistisempaa jälkeä peleissä.

Teoriaa asian tiimoilta.
http://www.marmoset.co/posts/basic-theory-of-physically-based-rendering/

TEHTÄVÄ 2

-Tee kolme tilettyvää tekstuuria (voit käyttää cgtexturesta löytyviä tekstuureja) photoshopissa, puu, metalli ja kivi.
-Tee jokaisesta diffuse, normal, ao ja specular mapit.
-Vie tekstuurit unytyyn ja tee niistä materiaalit kolmeen eri planeen, pyri realismiin.

TEHTÄVÄ 3 

-Tee kolme käsinpiirrettyä tekstuuria photoshopissa, puu, metalli ja kivi.
-Tee ainakin metallille specular map
-Vie tekstuurit unytyyn ja tee niistä materiaalit kolmeen eri planeen.

Unity platformer - menu & UI

NME17AP

Lukuvuosi 2017-2018

GAME MENU & UI

Assigment:

Present 6 different game menu/UI of which 3 have good design and 3 have bad design. Explain why you chose them.

MENU IN UNITY

In this assignment you are going to use NGUI to make your game menu. NGUI is a very powerful tool for creating graphical user interfaces. You can use it for inventories, crafting systems, health bars, menus and many more applications.

Start by creating new scene for your menu. New scene can be created from the file tab in the top tool bar. 

Next you need to create new label for your game title. Select NGUI -> create -> label. The system makes UI root object automatically. This is the base for all the GUI objects you need in your game. You need to select the UI root to change settings in it. Select proper width and height for your project so that all the objects in the UI root will scale according to your settings.


Then you’re going to make changes to the label created before. Change the size of widget so that you can fit larger font in it. Change the font size too so that the title of the game is clear and attracts most of the attention. You can also select color and gradient for the label from the UI label menu.


Create two more labels. One named new game/start and the other one named exit. We want to be able to start a new game by selecting new game which will take us to the first playable level of the game. We also need exit so that the player can exit the game without pressing ctrl+alt+del.


Then you’ll need an empty game object to create controls for the menu. This time you’re going to use arrow keys to navigate the menu. Add FSM in the empty game object. There will be 4 states in this FSM. In the first state you need two get key down actions. First is for the arrow key and second is for enter. With the arrow key you can navigate to the next state that will activate the exit label. The enter key will confirm that the player wants to start a new game and it transitions to the state where a new level is loaded.


The next state will be like the first state. This time you need to make transition back when you press arrow key up. Pressing enter will take you to another state that will quit the application. You’ll also want to use some indicator that the exit game label is selected. Easier way to do this is to use different color. You need to set property for the UI label to change its color and second set property to change the new game label color back to the color that tells the player new game is not active.


Create two more states. One is for quitting the game and in that one you’ll need the quit application action. In the other state select load level action. Write the level name you want to load in that action.


Lastly you need to make sure that both levels you have created are in the build. When the game is built it makes .exe file from the scenes you have added to the build. If you have no scenes in there, then it won’t be able to build anything. It’s important to have the menu scene at the top of the list because it will be the first scene the game loads. Build settings can be accessed from the top tool bar under file tab.

perjantai 15. syyskuuta 2017

SAIJA JA HARRI - APPROVED GAMES #1

NME17AP, NAV16AP ja NAV15AP

Lukuvuosi 2017-18


Tässä blogitekstisarjassa Saija ja Harri suosittelevat kaikille Animaatio- ja peliopiskelijoille ammattialaan liittyviä hyviä juttuja.

Tässä ensimmäisessä kirjoituksessa haluamme kannustaa teitä pelaamaan kaikilta osa-alueiltaan loistavia 2d-pelejä ja valaistumaan niiden erinomaisuudesta.


Saija

Playdeadin Limbo ja Inside


Harri

LucasArtsin kaikki pelit, mutta varsinkin Monkey Islandit